If you manage any network devices, routers, switches, firewalls, you already know configs change over time. Someone tweaks a VLAN, updates a firewall rule, or reboots a device after a manual edit. Oxidized is a free, open source tool that solves one simple problem: it automatically connects to every device on a schedule, downloads its current configuration, and saves a timestamped copy using Git, a version control system that tracks every change. Think of it as an automatic save history for your entire network, so you always know exactly what changed and when, without doing it by hand.
For those managing larger fleets, Oxidized is the layer that answers "what changed, and when." It connects to every device on a schedule, pulls the running config, and commits it to Git. Here is exactly how I set it up, step by step.
Prerequisites
- A dedicated VM or LXC container (Ubuntu 22.04/24.04)
- Ruby 3.x
- SSH or Telnet reachability to your devices
- Read-only credentials on each device, ideally a dedicated service account
1. Install Ruby and dependencies
sudo apt update
sudo apt install -y ruby ruby-dev build-essential git libsqlite3-dev
2. Create a dedicated user
Don't run Oxidized as root. Create a dedicated service account instead:
sudo useradd -m -s /bin/bash oxidizeduser
sudo su - oxidizeduser
Run the remaining setup steps as this user unless a step explicitly needs sudo.
3. Install Oxidized as a gem
sudo gem install oxidized oxidized-web4. Create the config directory
mkdir -p ~/.config/oxidized
cd ~/.config/oxidized
5. Write the base config
Create config in that directory:
username: your-ro-user
password: your-ro-password
model: ios
interval: 3600
use_syslog: false
debug: false
threads: 30
timeout: 20
retries: 3
prompt: !ruby/regexp /^([\w.@-]+[#>]\s?)$/
rest: 127.0.0.1:8888

vars:
  enable: your-enable-password

source:
  default: csv
  csv:
    file: ~/.config/oxidized/router.db
    delimiter: !ruby/regexp /:/
    map:
      name: 0
      model: 1
      group: 2

output:
  default: git
  git:
    user: oxidized
    email: oxidized@yourdomain.com
    repo: "~/.config/oxidized/oxidized.git"

groups: {}

model_map:
  cisco: ios
  huawei: huawei
What the key settings actually do:
interval: 3600means Oxidized pulls every device once per hour (in seconds). Lower this for critical devices, raise it for stable ones with many nodes to reduce loadthreads: 30controls how many devices it connects to in parallel. Higher means faster full cycles, but can overwhelm slower devices or your own bandwidthtimeoutandretriescontrol how long it waits per device and how many attempts before marking it failed, tune these up for devices on slow or unreliable linkspromptis a regex matching the device's command prompt, this is what tells Oxidized "the device has finished responding." Getting this wrong is the most common cause of failed pullsoutput: gitmeans every pulled config becomes a Git commit, giving you full version history automatically, no manual saving required
6. Build your device list
Create router.db in the same directory, one line per device:
switch-01:ios:core
switch-02:huawei:access
router-01:ios:edge
Group devices by vendor and auth profile rather than hardcoding credentials per device wherever your device mix allows it.
7. Run it
oxidizedBy default this starts polling on the interval set above and exposes a small web UI on the rest address for checking status and diffs.

8. Run it as a systemd service
Create /etc/systemd/system/oxidized.service:
[Unit]
Description=Oxidized Network Config Backup
After=network.target

[Service]
Type=simple
User=oxidizeduser
ExecStart=/usr/local/bin/oxidized
Restart=on-failure

[Install]
WantedBy=multi-user.target
sudo systemctl daemon-reload
sudo systemctl enable --now oxidized
systemctl status becomes your quick health check, no need to keep a terminal window open.What it looks like day to day
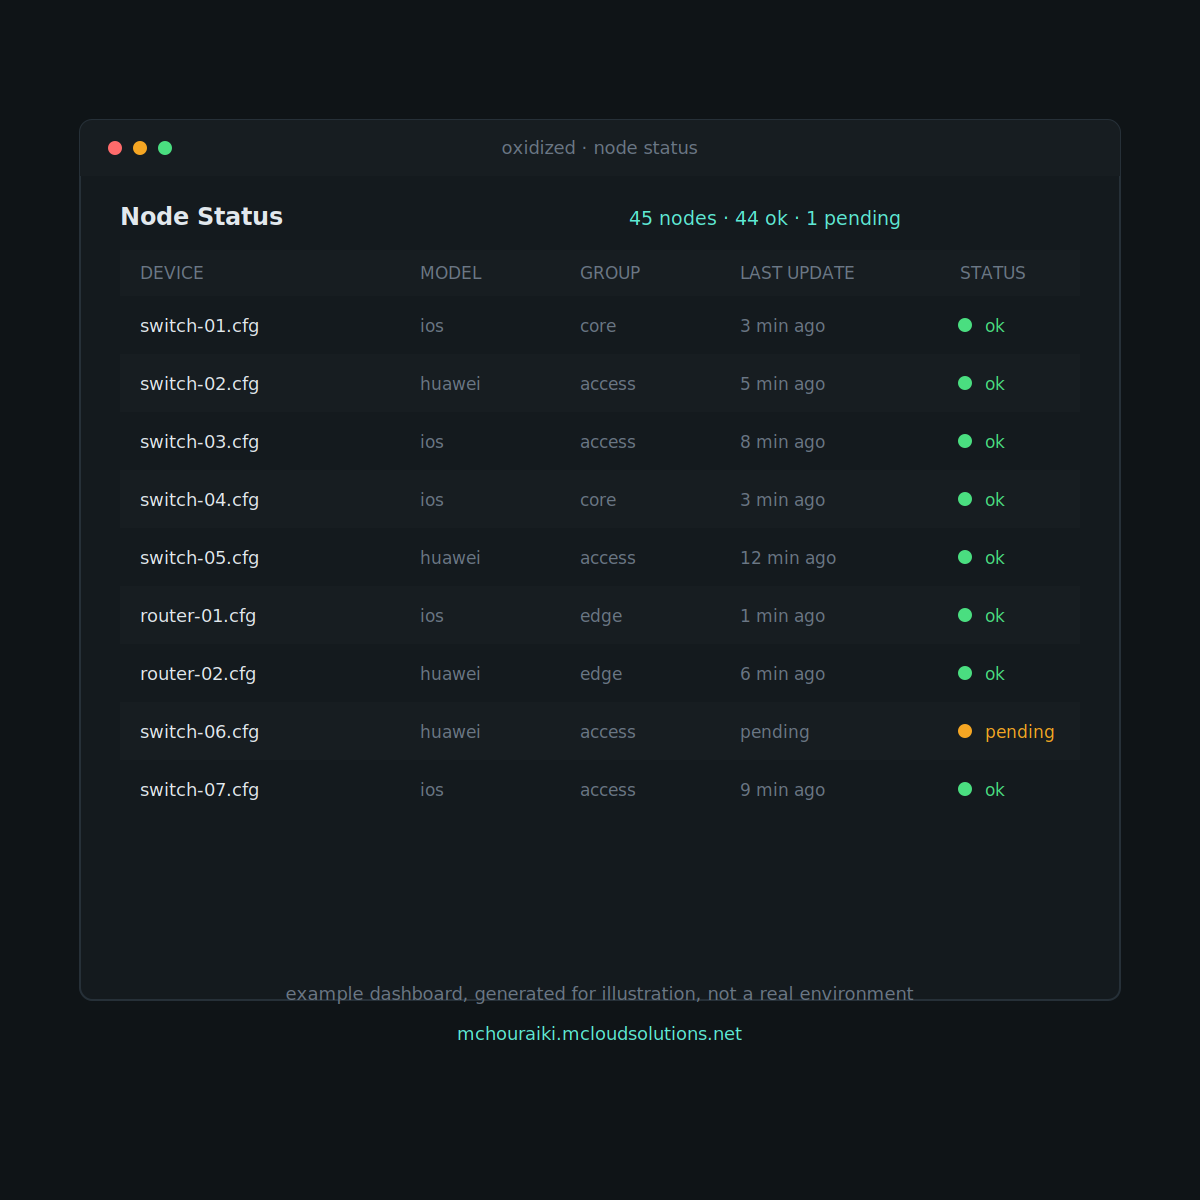
Once it's running for a while, this is the kind of visibility you get without touching a single device by hand.
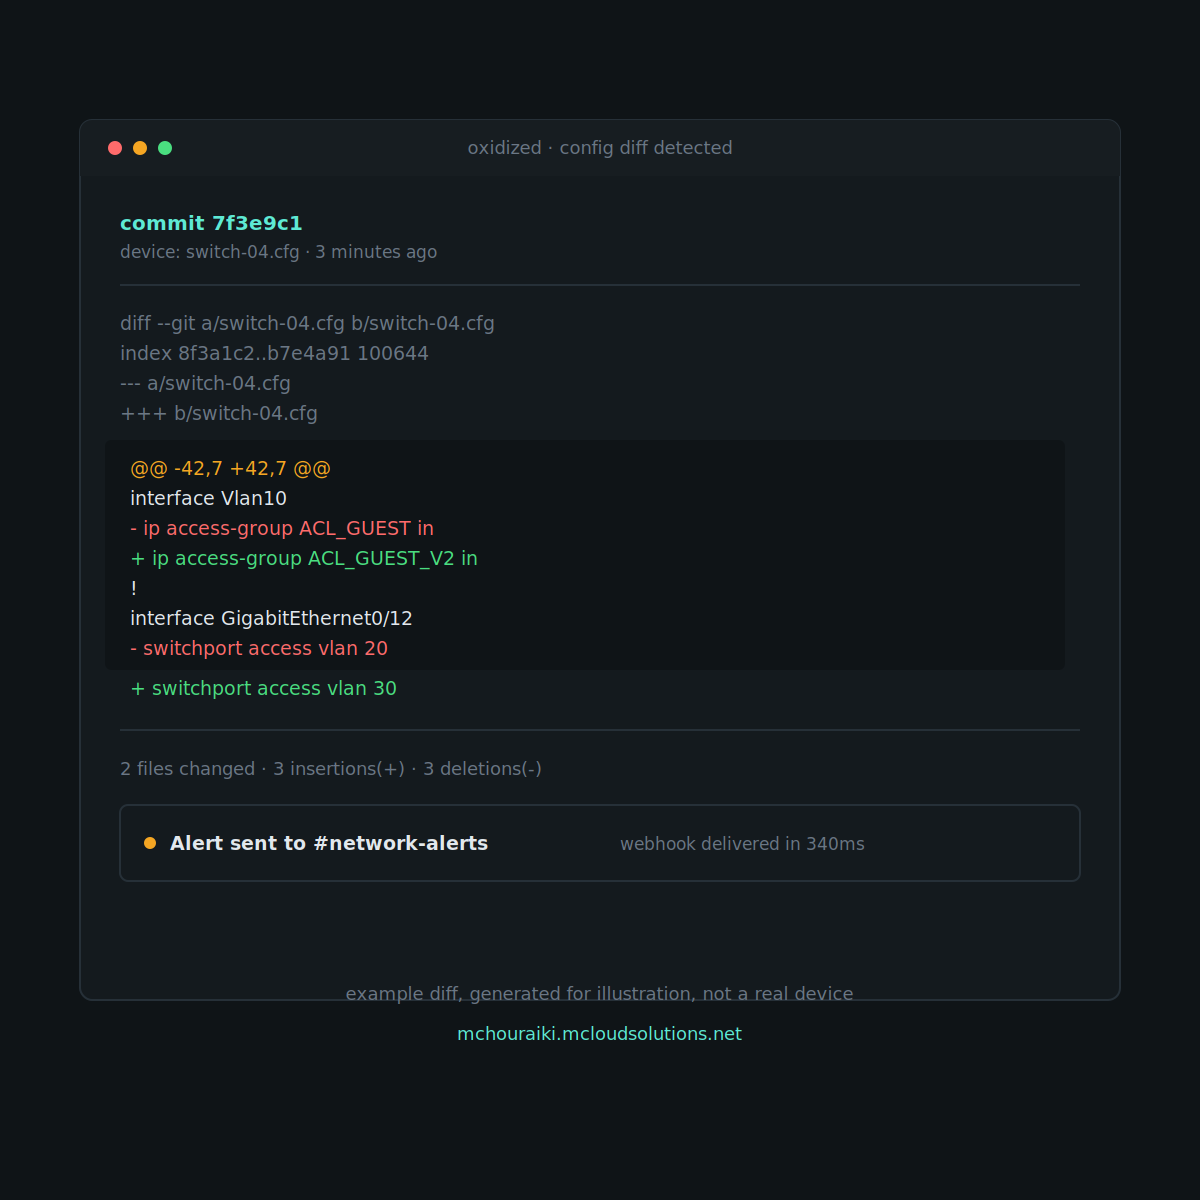
When something on the network changes, this is what shows up:
Security notes that matter more than the install steps
- Do not leave
ssh: secure: falsein your config. That disables host key checking and defeats the point of encrypted transport. Set it totrueand manage known_hosts properly - Store enable-mode and login passwords in a secrets manager, or at minimum restrict file permissions on the config to the oxidized user only (
chmod 600) - Push the Git backup to a remote off-box. A config history that lives only on the same host it is backing up is not a real backup
- Use a read-only account per vendor where the platform supports it, so a compromised Oxidized instance cannot push changes to your network
What I'd check before going to production
- Confirm your device prompt regex actually matches your specific OS/version, this is the most common source of failed pulls
- Test the enable-mode flow manually over SSH before trusting Oxidized to handle it unattended
- Set the interval based on how often your network actually changes, hourly is reasonable for most environments
Closing thoughts
This is one piece of a bigger stack. On its own, Oxidized answers "what changed." Paired with device health monitoring and uptime checks, you get the full picture: is it healthy, what changed, can anything reach it. If you haven't read the overview of how these pieces fit together, start there first.
Questions on your own setup, drop them in the comments on the LinkedIn post or reach out directly.